
Highland OrderFlow
Workflow Management
User Guide
🛠 Creating and customising workflows
A workflow defines the stages an order passes through from arrival to completion.
OrderFlow creates a suitable starting workflow during the Getting Started process. You can use that workflow as it is, customise it to match your operation, or create additional workflows.
Before changing your workflow: Consider the real stages an order passes through in your business. Keep the workflow as simple as possible — a stage should normally represent a meaningful operational step.
1. Open Workflow Management
From the WordPress administration menu, select:
OrderFlow → Workflows
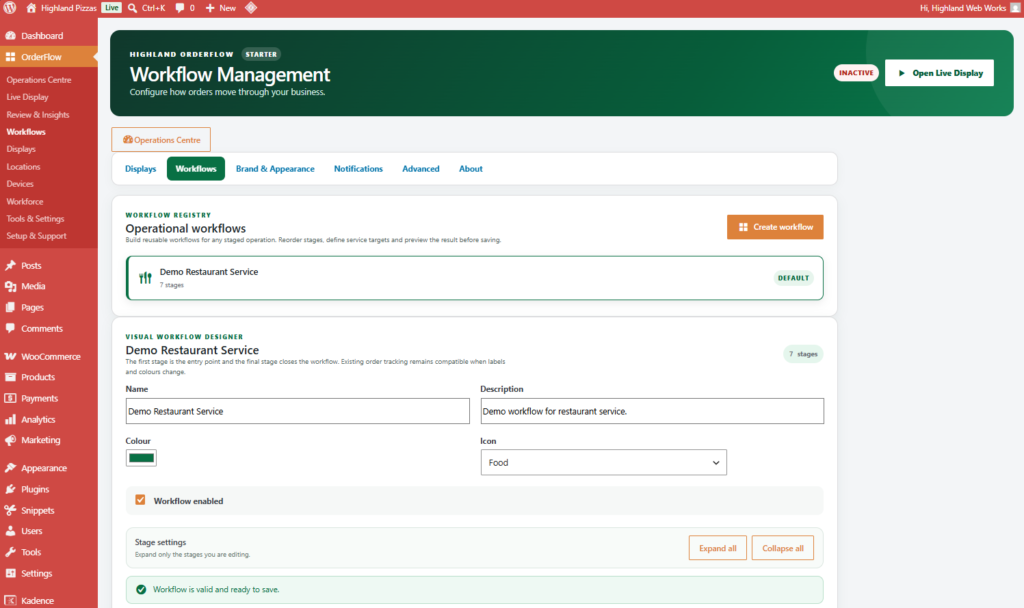
The Workflow Management screen displays your existing operational workflows.
The workflow marked Default is the workflow currently used as the default for your displays.
2. Select a workflow
Select the workflow you want to configure from the Operational workflows section.
The Visual Workflow Designer opens below the workflow registry.
Here you can change the basic workflow details, including:
- Name — the name used to identify the workflow.
- Description — an internal description of its purpose.
- Colour — the identifying colour for the workflow.
- Icon — the icon used to represent it within OrderFlow.
- Workflow enabled — controls whether the workflow is enabled.
OrderFlow checks the configuration as you work. A valid configuration displays:
✓ Workflow is valid and ready to save.
3. Configure your stages
Each workflow contains a series of stages representing the operational journey of an order.
For example, a restaurant workflow might use:
New Order → Preparing → Cooking → Quality Check → Ready → Out for Delivery → Completed
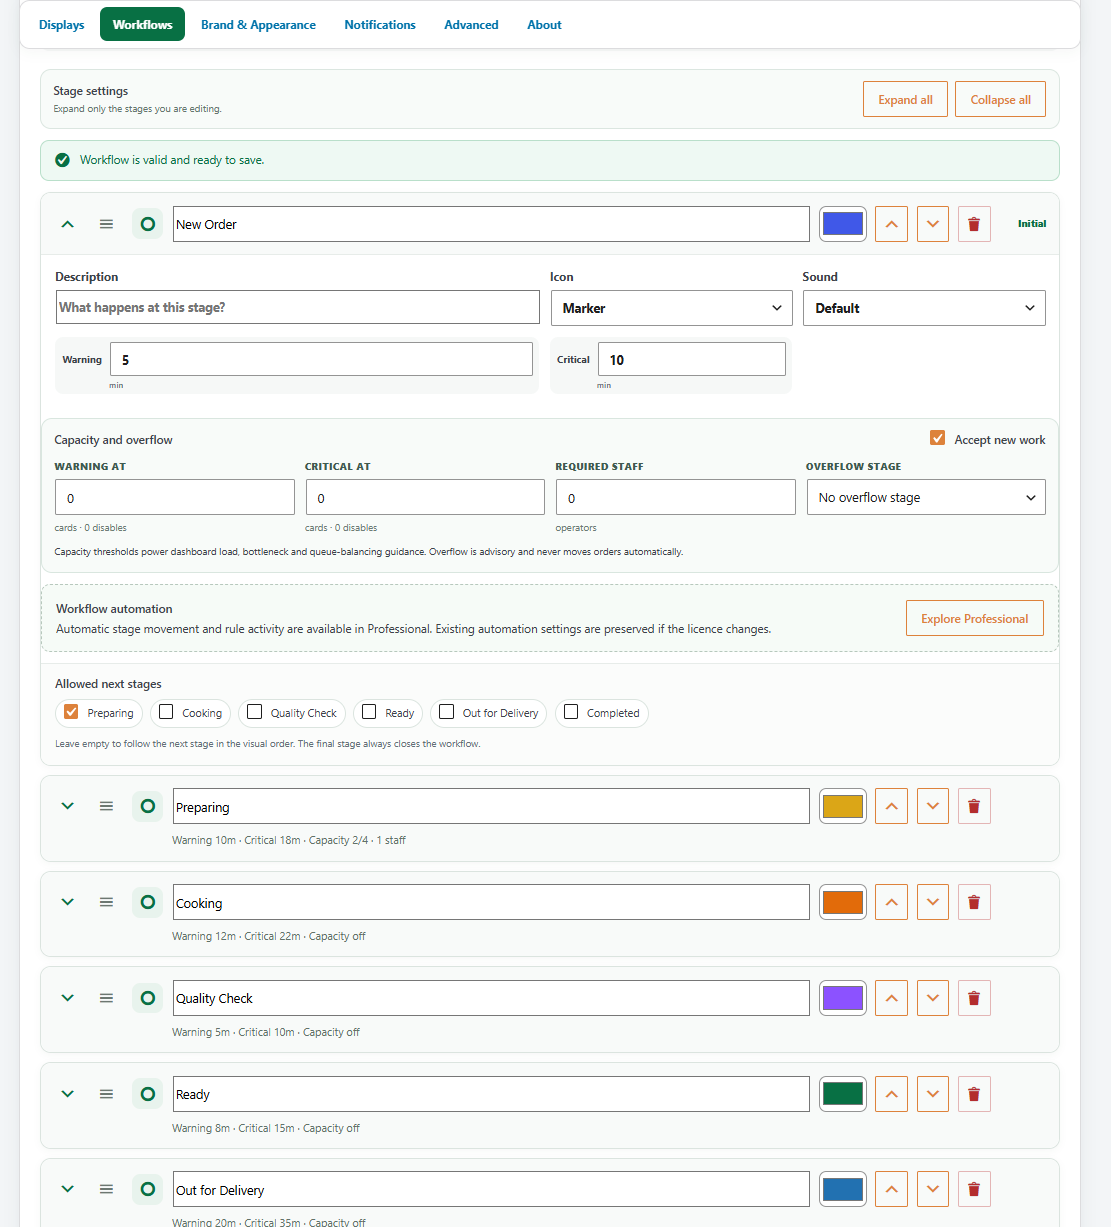
Expand a stage to configure it. You can also select Expand all to view the settings for every stage, or Collapse all to simplify the workspace.
For each stage you can configure the stage name, colour, description, icon, sound, warning time and critical time.
Important:
The first stage is the entry point for new orders, while the final stage closes the workflow.
Each workflow contains a series of stages representing the operational journey of an order.
Expand a stage to configure it. You can also select Expand all to view the settings for every stage, or Collapse all to simplify the workspace.
For each stage you can configure:
Stage name
Enter a clear name describing this point in the workflow, such as Preparing, Quality Check, Ready or Completed.
Colour
Choose a colour to visually identify the stage throughout OrderFlow.
Description
Add a short description explaining what happens at this stage.
Icon
Choose an icon appropriate to the activity.
Sound
Choose the sound associated with the stage where applicable.
Warning and critical times
The Warning and Critical values define the time targets for the stage, in minutes.
For example:
Warning: 10 minutes
Critical: 18 minutes
These targets allow OrderFlow to identify orders that are taking longer than expected and help staff recognise delays before they become serious.
Tip:
Set targets that reflect realistic operating times. Targets that are too short can cause normal work to appear overdue, while targets that are too long may hide genuine delays.
4. Configure capacity and overflow
Each stage can also contain operational capacity information.
Accept new work
Enable Accept new work when orders can enter this stage as part of normal workflow processing.
Warning at
Enter the number of orders/cards at which the stage should be considered busy.
Enter 0 to disable this threshold.
Critical at
Enter the number of orders/cards at which the stage should be considered critically loaded.
Enter 0 to disable this threshold.
Required staff
Enter the number of operators normally required to operate this stage.
This information helps OrderFlow understand operational demand and provide capacity and staffing guidance.
Overflow stage
An Overflow stage can be selected to identify an alternative stage when additional capacity is available elsewhere.
Capacity guidance: Capacity thresholds are used for dashboard load, bottleneck and queue-balancing guidance. Overflow is advisory and does not automatically move orders.
5. Control where an order can go next
The Allowed next stages setting controls which stages can follow the current stage.
For a straightforward sequential workflow, select the next normal stage.
For example:
New Order → Preparing
More complex workflows can allow an order to move to more than one possible next stage.
If no specific next stage is selected, OrderFlow follows the next stage in the visual order.
The final stage always closes the workflow.
Example:
A Quality Check stage might normally progress to Ready, while also allowing an order to return to Preparing if additional work is required.
6. Reorder, add or remove stages
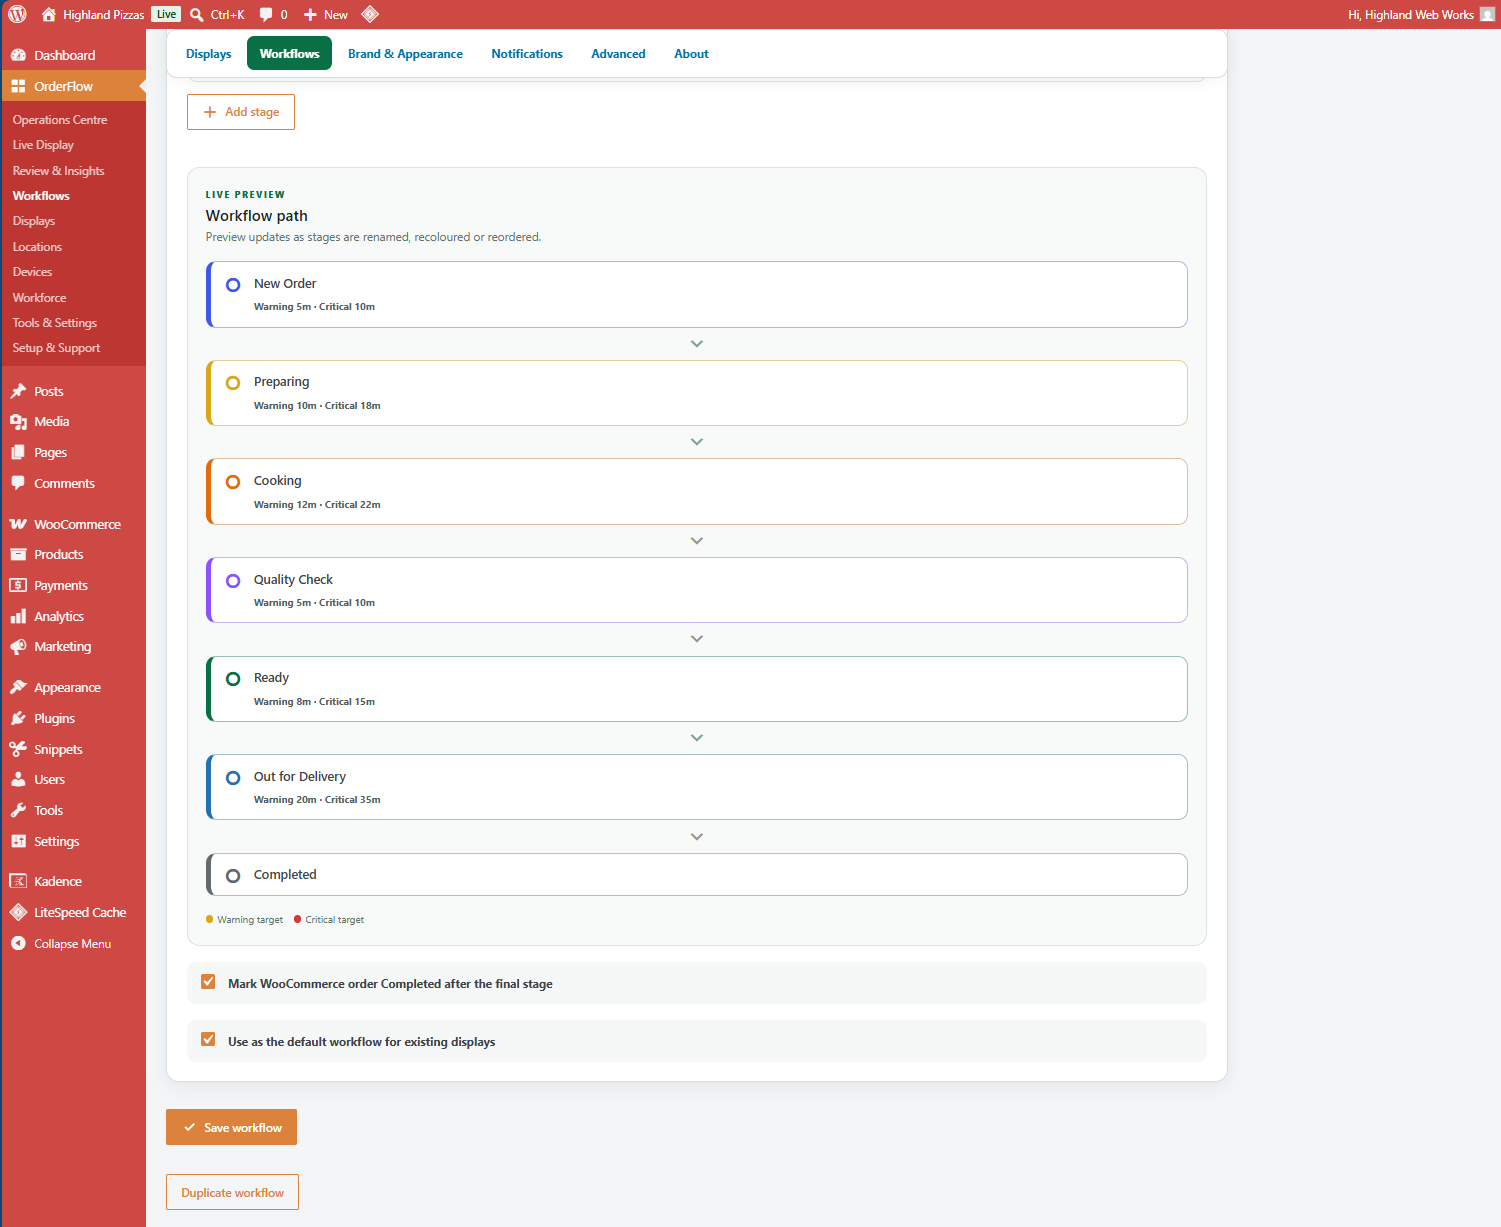
Use the up and down arrows beside a stage to change its position in the workflow.
You can also use the stage controls to remove a stage that is no longer required.
Select Add stage to introduce another operational step.
As you make changes, the Live Preview updates to show the resulting workflow path.
The first stage is always the workflow’s entry point, while the final stage closes the workflow.
Take care when changing an established workflow. Existing order tracking remains compatible when stage labels and colours are changed, but structural changes should be tested before using the revised workflow in live operations.
7. Decide what happens at completion
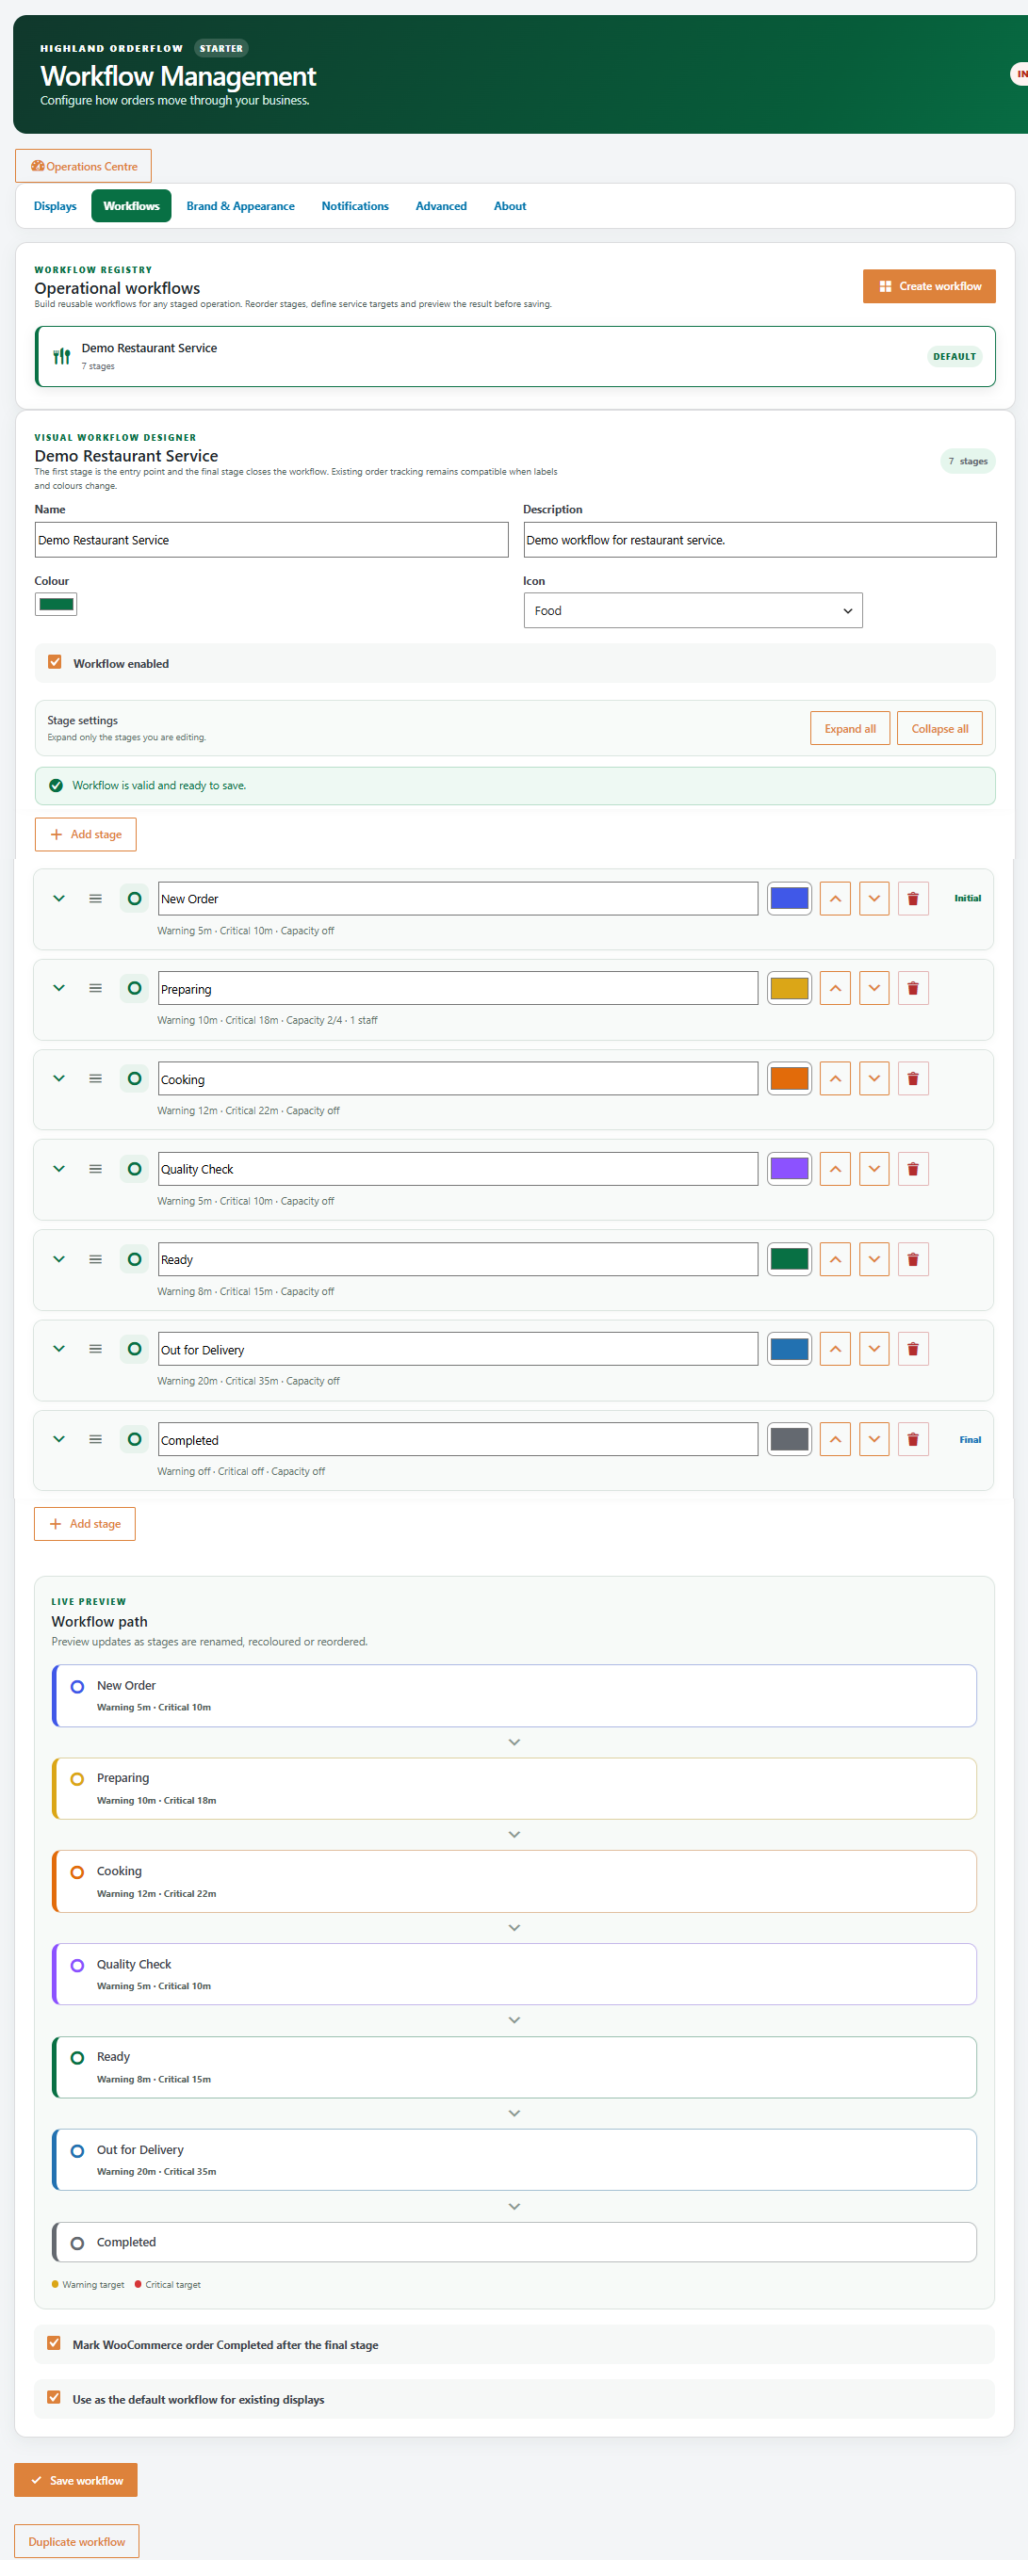
Below the workflow path are workflow behaviour options.
Mark WooCommerce order Completed after the final stage
Enable this if reaching the final OrderFlow stage should automatically mark the associated WooCommerce order as Completed.
This is an important setting. I’d give it a green information box rather than burying it in ordinary text:
WooCommerce integration: Enable this option when completing the operational workflow should also complete the order in WooCommerce. Leave it disabled if your WooCommerce order status needs to be managed separately.
Use as the default workflow for existing displays
Enable this option if this workflow should become the default workflow used by your existing OrderFlow displays.
8. Save your workflow
When the workflow is configured correctly, select:
Save workflow
OrderFlow validates the configuration and saves your changes.
You can then open your Live Display to check that the workflow behaves as expected.
Duplicate an existing workflow
Select Duplicate workflow when you want to create another workflow based on the current configuration rather than starting again.
This is particularly useful when two parts of your operation follow similar processes but require slightly different stages or timings.
9. Creating another workflow
From Workflow Management, select:
Create workflow
OrderFlow then asks you to choose a starting point.
Starter
Starter includes Blank Workflow.
Select Use template to create a new configurable workflow with four neutral starting stages:
Stage 1 → Stage 2 → Stage 3 → Stage 4
You can then rename, arrange and configure those stages for your operation.
Screenshot: Use your third/fourth screenshot here.
Professional feature: Professional provides additional reusable workflow templates and options for moving workflow configurations between OrderFlow installations. Starter users can create and customise workflows using the Blank Workflow starting point.
Tips for designing a good workflow
This gives the documentation some actual operational value rather than merely describing buttons.
Duplicate before major changes. If you’re significantly redesigning an established workflow, creating a duplicate gives you a safer starting point.
Keep stages meaningful. Don’t create a separate stage for every minor task.
Match the real operation. Staff should immediately understand what moving an order to the next stage means.
Use clear stage names. Prefer Preparing, Ready for Collection or Dispatched over ambiguous internal terminology.
Set realistic time targets. Warning and critical targets should identify genuine exceptions rather than making every order appear late.
Test before going live. Run a test order through every stage and confirm both the OrderFlow display and WooCommerce behaviour.